1. Go to the Modify tab and select Align tool (Modify panel) ![]() or use shortcut keys AL.
or use shortcut keys AL.
2. Select the reference element (click on the line or side of the element you wish to align the element to) and then click on the side of your element you wish to align. You can also:
- align multiple elements: press CTRL while selecting multiple elements to align.
- use Lock to apply a constraint between the elements as they are aligned. When a constrained element is moved, the other will be moved with it maintaining the constraint alignment.
- Select how patterns applied to surface will behave when aligned. Patterns can be aligned across the entire surface, or each face of an element can have a separate pattern alignment.

Example: Align the ends or centers of walls or beams with selected beams, lines, or walls, adjusting window heights, and joining endpoints of walls with a selected line.
You can find more information about Align tool here.
Note: Before selecting the side of the element, you wish to align (to), move the cursor over the element until the side of the element gets highlighted. Then click it.
3. You can control constraints of the element by using the padlock. Locking the padlock will make reference element (if you later move it) aligned with selected element. Note: I the padlock symbol disappears (is no longer displayed because you have done something else) click Modify and select the reference element to make the symbol redisplay.
4. Press ESC once, to start a new alignment.
5. Press ESC twice, to exit the Align tool.
Align Tools for Annotation Tags
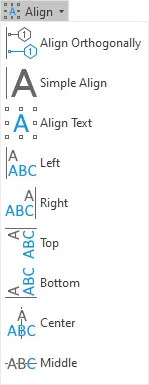
Kobi Toolkit for Revit offers additional tools for alignment, that will help you align text notes or labels to other text notes, labels or lines. These tools are extremely helpful when editing your annotation tags.
There are 9 different options. To access them Go to Kobi Toolkit for Revit tab and in the Annotate panel click on Align drop-down.

All the functionalities of Kobi Toolkit Align tools are described here.
Align Viewport on Sheet
To Align Viewport on Sheet, go to Kobi Toolkit for Revit tab. Go to View panel Sheet drop-down and select Align Viewport on Sheet.
A new dialog box opens up. Here you can enter offset value and click on Left/Top/Right/Bottom to align the viewport to the left/top/right/bottom side with selected offset.
Try Align tools yourself and and download a free trial of Kobi Toolkit Kobi Toolkit for Revit.


