# Line Markings
Command Description
The “Line Markings” command allows you to create and edit Line Markings. You can create custom templates for Line Markings. In this command, the projection of Line Markings to the selected Surface is also available.
To create Line Markings
Click Kobi Signs and Stripes tab > Markings panel > Line Markings
 .
.Select the polyline, alignment or the existing line marking in a drawing.
- Select the Line Marking from a templates drop-down list.

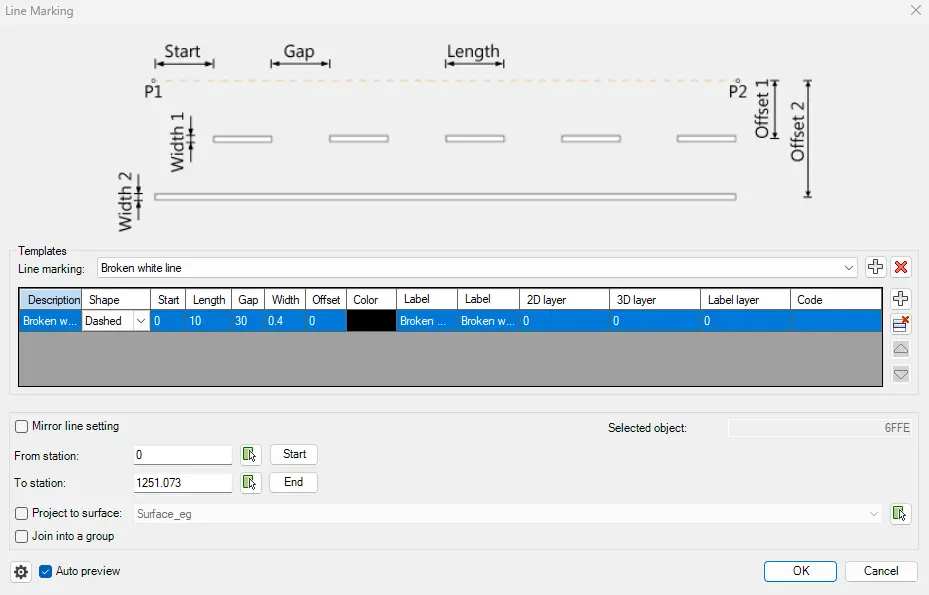
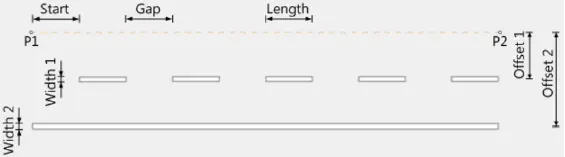
- Optionally edit the parameters of each Line Marking item: Description, Shape, Start, Length, Gap, Width, Offset, Color, Label formula and Label preview. The parameters are explained in the figure in the upper part of the “Line Marking” dialog box.
Select a Line Marking layer from the “Line layer” drop-down list. Or type the new layer name in the field.
Select the “Mirror line setting” to create a mirrored copy of the selected Line Marking items across the source polyline / Alignment.
Specify the starting and ending station for drawing Line Markings:
Type station values in the fields,
Or click
 to specify start and end stations on the selected line/alignment,
Or click the
 and
and  to draw Line Markings from the start to the end point of the selected line/alignment.
Choose the “Project to Surface” option and select a Surface from the drop-down list. Or click
to select a TIN Surface in the drawing.Choose the “Join into a group” option to join line markings into a group.
Click
 for the additional Line Markings settings:

Select a 3D projection layer from the “Projection Layer” drop-down list. Or type the new layer name in the field.
Enter the elevation of the Line Markings 3D projections above the selected Surface.
Enter the Mid ordinate distance – the precision of curves approximation with 3D Line Markings.

- Select a Label layer from the “Projection Layer” drop-down list. Or type the new layer name in the field.
Select the “Auto preview” option to preview defined Line marking in the drawing before inserting.
Click
 in the “Line Marking” dialog to draw Line Markings.
NOTE: Do not erase Line marking base polyline, otherwise Line marking editing will no longer be possible.
To edit Line Markings
Click Kobi Signs and Stripes tab > Markings panel > Line Markings
.Select existing line marking in a drawing.
Edit the desired parameters in the “Line Marking” dialog.
Click
to finish editing and close the dialog.
To work with Line Markings templates
Launch the “Line Markings” command.
Select the polyline, alignment or the existing line marking in a drawing.
The “Line Markings” dialog opens.
Select the existing Line Marking as the base from the “Line Marking” drop-down list.
Click
 to add a new Line Marking item and define its parameters.
Erase existing Line Marking item by clicking
 .
.Click
 to move the selected item up the list or
  to move it down the list.
Click
to add a new Line Marking template.
