# Markings Report
Command Description
This command creates Road Marking report for the selected Marking types. You can include any Road Marking Attribute in the report table.
To create Markings Report
- Click Kobi Signs and Stripes tab > Markings panel > Markings Report
 .
.
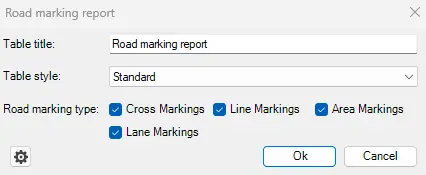
Enter the name of the Table title in the “Road marking report” dialog box.
Select the table Style from the drop-down list.
Select the Road Marking types to include in the report.
Click
 to access detailed Traffic Signs report settings:
Cell text height – specifies the cell height according to the text height in the Header of each Column,
Cell text width – specifies the cell width according to the text width in the Header of each Column,
Block column margin ratio - The value of this factor is inversely proportional to the size of the Sign image in the cell. The higher the specified value, the smaller is the Sign image in the cell. Value 0 means that size of the Sign fits to the cell. The “Block column margin ratio” factor is considered only if the parameters “Sign holder size factor” and “Sign size factor” are set to the "Auto".
define decimal and thousands separators.
- Click
 the in the “Column editor” dialog to select Attributes of the Road Markings to be included in the report table. Optionally change the name of the Column Headings.

Click the checkboxes for the attributes that you want to include in the report. Or click the “Select all” to select all attributes.
for each selected attribute, enter its name in the “Translated text” field, which will be displayed in the report table.
Click
 and
and  to change the order of the attributes in the report table.
Click
 to reload data from external JSON encoded settings file.
i. The JSON files are located on the following path: C:\Users\Username\AppData\Roaming\KobiLabs\SignsAndStripes ii. Since the JSON files includes the same editing options that are available in the “Column editor”, it’s not recommended to edit settings in these files.
- Click
 in the “Column editor” dialog to confirm settings.
Click
in the “Road marking report” dialog.Specify the report table insertion point.